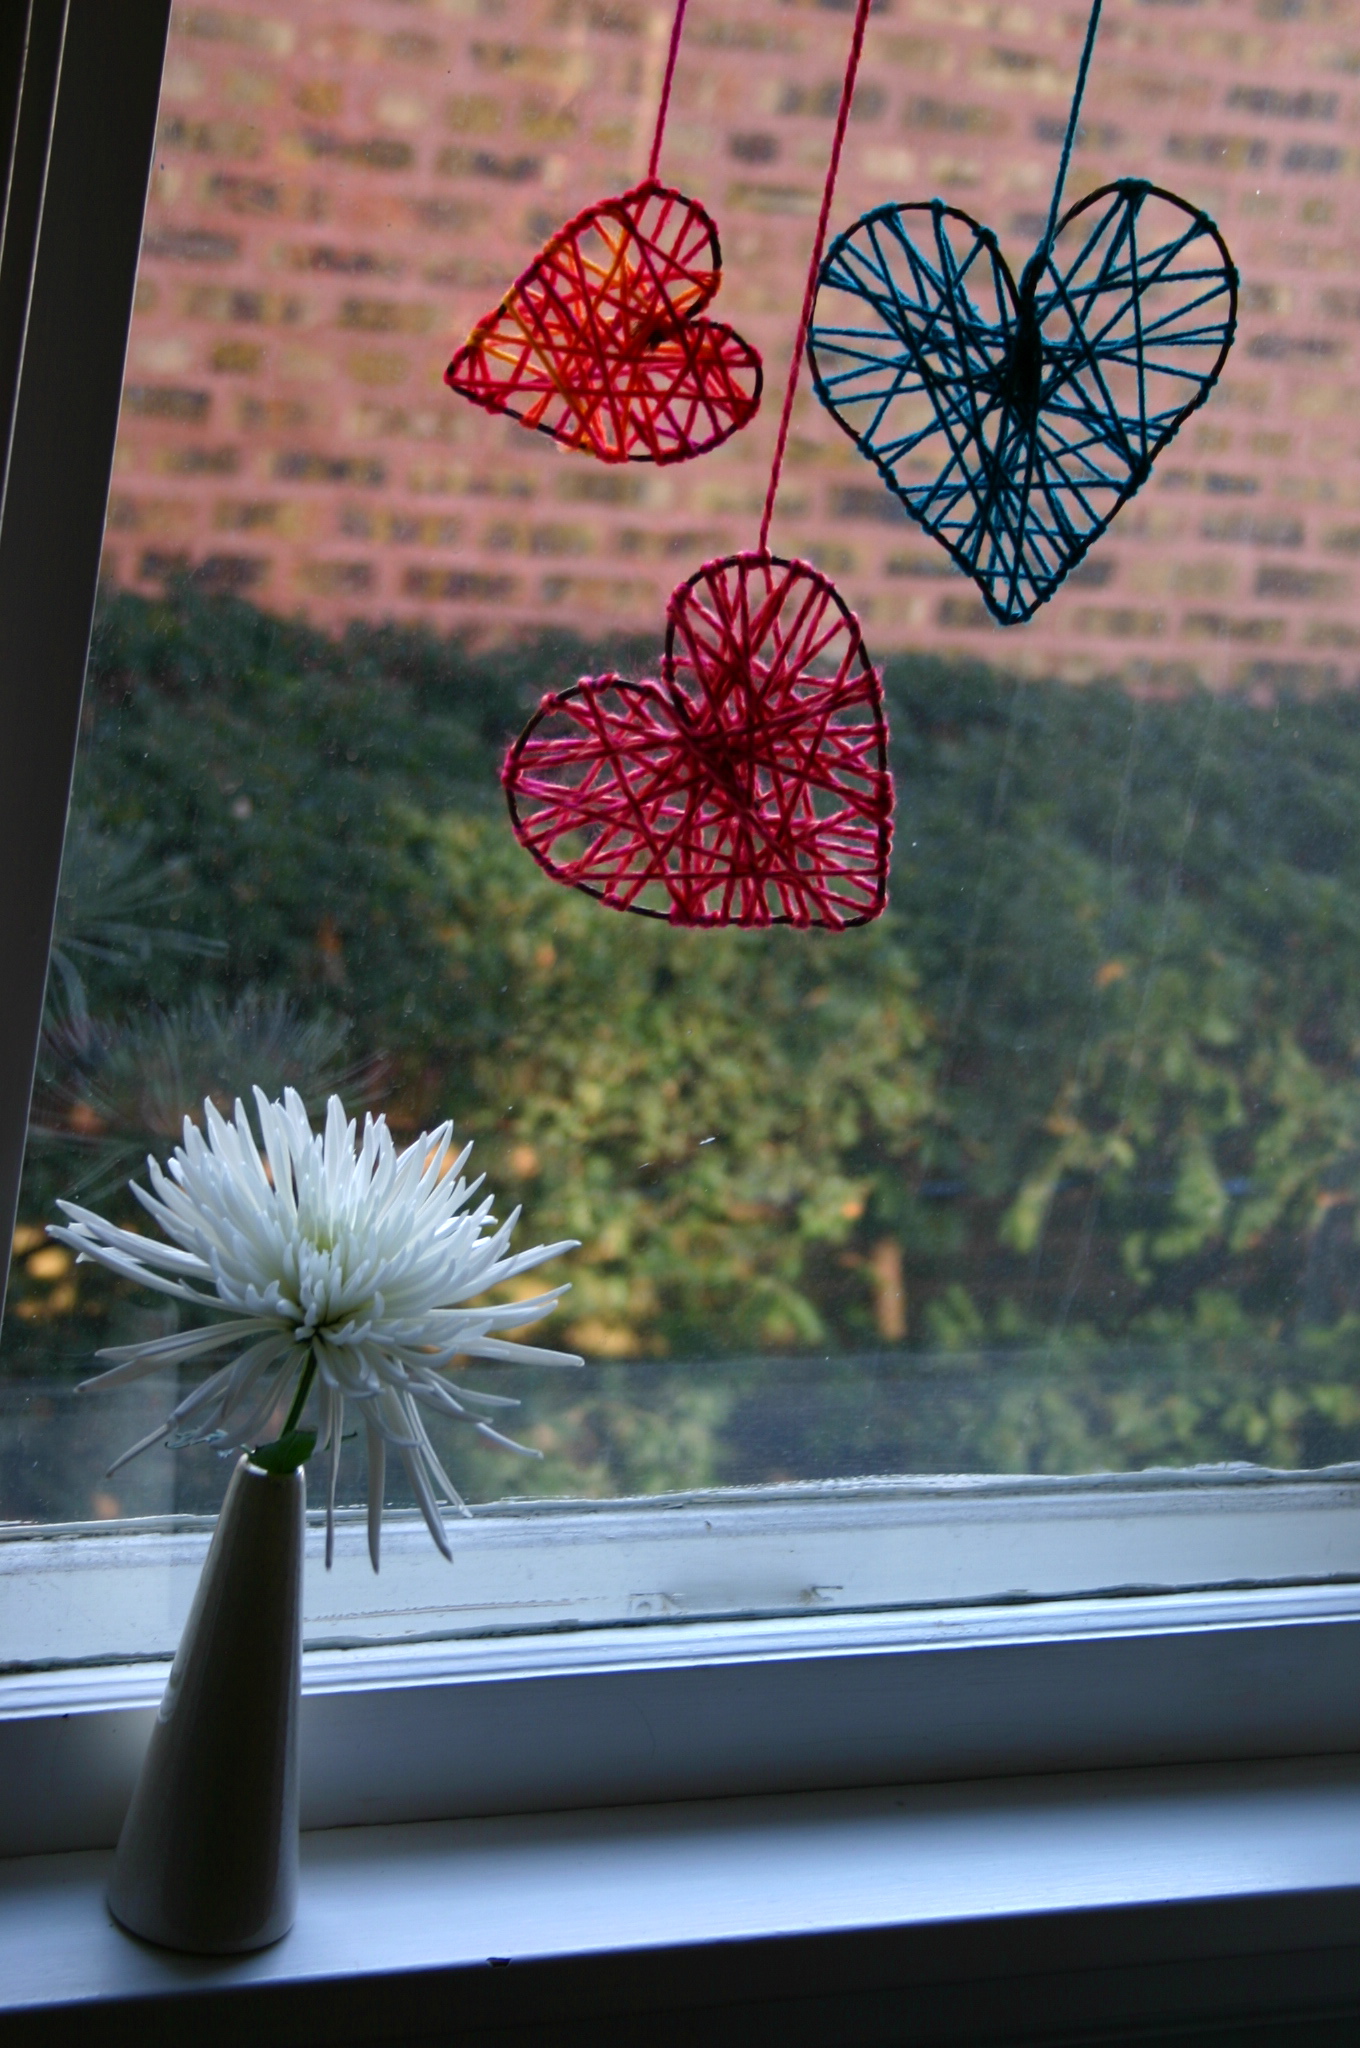

Hearts made from rustic floral wire are wrapped with yarn and hung in the window for Valentine's Day.


To make these you will need: rustic floral wire (available in the floral section of any craft store - it's like wire wrapped in craft paper), wire cutters, yarn and scissors.

Clip off a length of floral wire and bend into a heart shape; twisting the ends together to secure.

Tie yarn onto heart.

Pull yarn across heart, wrap around wire and pull yarn across to the other side.

Wrap yarn securely so there is no slack.

Tie a knot and cut yarn with enough length for hanging.

You could also tuck a note inside and give it as a valentine.
Molly
January 9, 2011 at 7:24 pm
So so so cute!!! My girls and I will be making these!!!
Rachel
January 10, 2011 at 3:37 pm
It is taking so much willpower for me to not drop everything and make these right now. Love, love, love! I’ll be linking.
camilla
January 10, 2011 at 8:15 pm
Rachel – you are so sweet! I love your site – thanks for linking! Happy New Year! C
kelly
January 11, 2011 at 8:55 am
this is a great craft..my sister and I are having a craft day on Saturday..we can do this one with the kids! thanks for sharing!
Libby
January 12, 2011 at 9:32 am
these are so wonderful! thanks for posting 🙂
Terri
January 12, 2011 at 5:01 pm
Love your hearts! So easy, too! Thanks for the tut.
Terri
Carla
January 12, 2011 at 8:45 pm
These are so cute. I love that they are easy to do. I can feel a craft coming on!
Lindsey
January 12, 2011 at 8:49 pm
Love them! I linked to you and then adapted them into a garland on my site. Check it out!
http://thatsaintpaulhouse.blogspot.com/
camilla
January 13, 2011 at 7:55 am
Lindsey – Thanks! They look great! What a wonderful idea! Take Care, Camilla
Ninočka
January 18, 2011 at 2:01 am
So adorable! I like it very very much.
Peechee from Candy Cake and Crafts
January 19, 2011 at 9:54 pm
I just love this idea. So quick, easy, cheap, and fun. My lil’ boy will have fun doing this with me. I’ve added a pic and your link to my blog.
Thanks!!!
Heather @ Life Gluten Free
January 22, 2011 at 5:01 pm
These are so lovely!! I can’t wait to make them.
Pingback
Jane
January 27, 2011 at 1:58 pm
Love this!
Mary Williams
January 28, 2011 at 10:41 am
I love these! They are too cute! I featured them on my friday favorites!
http://lilbitofus.blogspot.com/2011/01/friday-favorites_28.html
Cory
January 28, 2011 at 12:51 pm
LOVE LOVE LOVE these.
found you “accidentally” while blog surfing.
having problems posting this….sorry if there was double post.
Cory
JoAnn
January 28, 2011 at 7:42 pm
So cute!! Can’t wait to do these with my 6yo. 🙂
KJ@letsgoflyakite
January 28, 2011 at 8:03 pm
I just saw this on the Crafty Crow and I wanted to tell you that is a wonderful project with so many applications.
Candace @ NaturallyEducational
January 28, 2011 at 10:48 pm
Beautiful! I’ll be posting our beaded hearts, soon…and I think I will try these next. I shared on twitter and facebook. I’m here via The Crafty Crow.
Brooke
January 30, 2011 at 9:32 pm
I LOVE these 🙂 What a simple yet wonderful idea for Valentines!
PS flew over from the crafty crow. We may try these and if I do i will be sure to link back 🙂
Breeanna
February 6, 2011 at 1:18 am
these are awesome! I want to make them. Thanks!
Jamie @ hands on : as we grow
February 7, 2011 at 7:48 am
I love this project! It looks so cute! and I think my toddler could help wind the yarn around the wire.
I featured this post on this week’s High Five! – Be sure to check it out!
http://handsonhouse.blogspot.com/2011/02/high-five-week-2.html
Jamie @ hands on : as we grow
camilla
February 7, 2011 at 10:42 am
Thanks Jamie! This is definitely an easy craft for a wide range of ages – glad you like it 🙂 Take Care, Camilla
Melissa
February 12, 2011 at 9:29 pm
This is great! I would love to try this!
Pingback
Pingback
trudi
March 22, 2011 at 5:01 am
Hi – these are too cute — I had a go but had trouble getting the yarn to stay where I wound it, any tips?
thanks
camilla
March 22, 2011 at 7:01 am
Hi Trudi! I wrapped the yarn around tightly – held it in place by pinching it with my fingers until I wrapped it around on the other side. This method held the yarn in place. I hope this helps. Let me know how it turns out. Thanks for your comment!
Take Care, Camilla
Alexandra
December 30, 2011 at 4:08 pm
Thank you for this. I have a new boyfriend (Yay!) and these would be perfect for valentines day in a couple of months 🙂 Xxxxx
seemommycraft
January 13, 2012 at 7:38 pm
Luv these! Will definitely be making them for our kitchen windows!
marilynn
January 17, 2012 at 1:39 am
So cute! I’m going to have my second graders make these and put them on a wooden stand. They will give them to the senior center in town for table decorations.
Julie @White Lights on Wednesday
January 17, 2012 at 4:24 pm
I thought these hearts were so great. i cna’t wait to make them with my boys when they get older. I featured them on my blog post today.
whitelightsonwednesday.blogspot.com
Julie 🙂
kitblu
January 24, 2012 at 3:26 am
I don’t recognize this floral wire. The one I familiar with looks like twist ties in a continuous length. What is this stuff you are using?
yaritza
January 26, 2012 at 10:28 pm
wooo!!!!!!
Kimberly
February 2, 2012 at 6:39 pm
Love this project, I would love to make this with my girl scout troop, Do you know how much of the floral wire and yarn you used for each heart? I would hate to not have enough.
camilla
February 2, 2012 at 6:48 pm
Kimberly, Such a great idea – this is perfect for a GS activity! I would estimate about 16″ in floral wire and about a 1 to 1.5 yards of yarn for each heart. Hope this helps – best of luck, C
Kimberly
February 3, 2012 at 1:44 pm
Thank you so much! I can’t wait to make these !
Shoregirl
February 3, 2012 at 6:38 pm
What a neat idea! I featured it in my Valentine Round up this past Wednesday…http://estherscardcreations.blogspot.com/2012/02/valentine-round-up.html
Thanks so much for sharing!
Martee
February 8, 2012 at 1:00 pm
We are making these with our high school Career Lab class of Special Needs students for decorations for our Valentine’s Day party! SO FUN!
Heather
February 14, 2012 at 8:12 am
this turned out wonderful! going to hang them in the window:) eeeek Valentines day tomorrow!!
Bella
January 14, 2013 at 6:18 pm
Just came across these on Pinterest. Love how they look!
Sheila Mae
January 17, 2013 at 10:18 am
I <3 your hearts. Thanks so very much.
Pingback
Verity {belle bébés}
February 4, 2013 at 2:29 pm
Belle Bébés featured this awesome tutorial today 🙂
Nicholas
May 1, 2013 at 3:17 am
Either I am too clumsy or too amateur. The yarn is not that secure to their position. I put a few drops of superglue to make they do not slide off their position
Sant
May 30, 2013 at 5:23 pm
Great!!!! Excelent craft, i love the hearts.
Web Design Blackburn
July 27, 2013 at 4:51 am
This is just adorable!