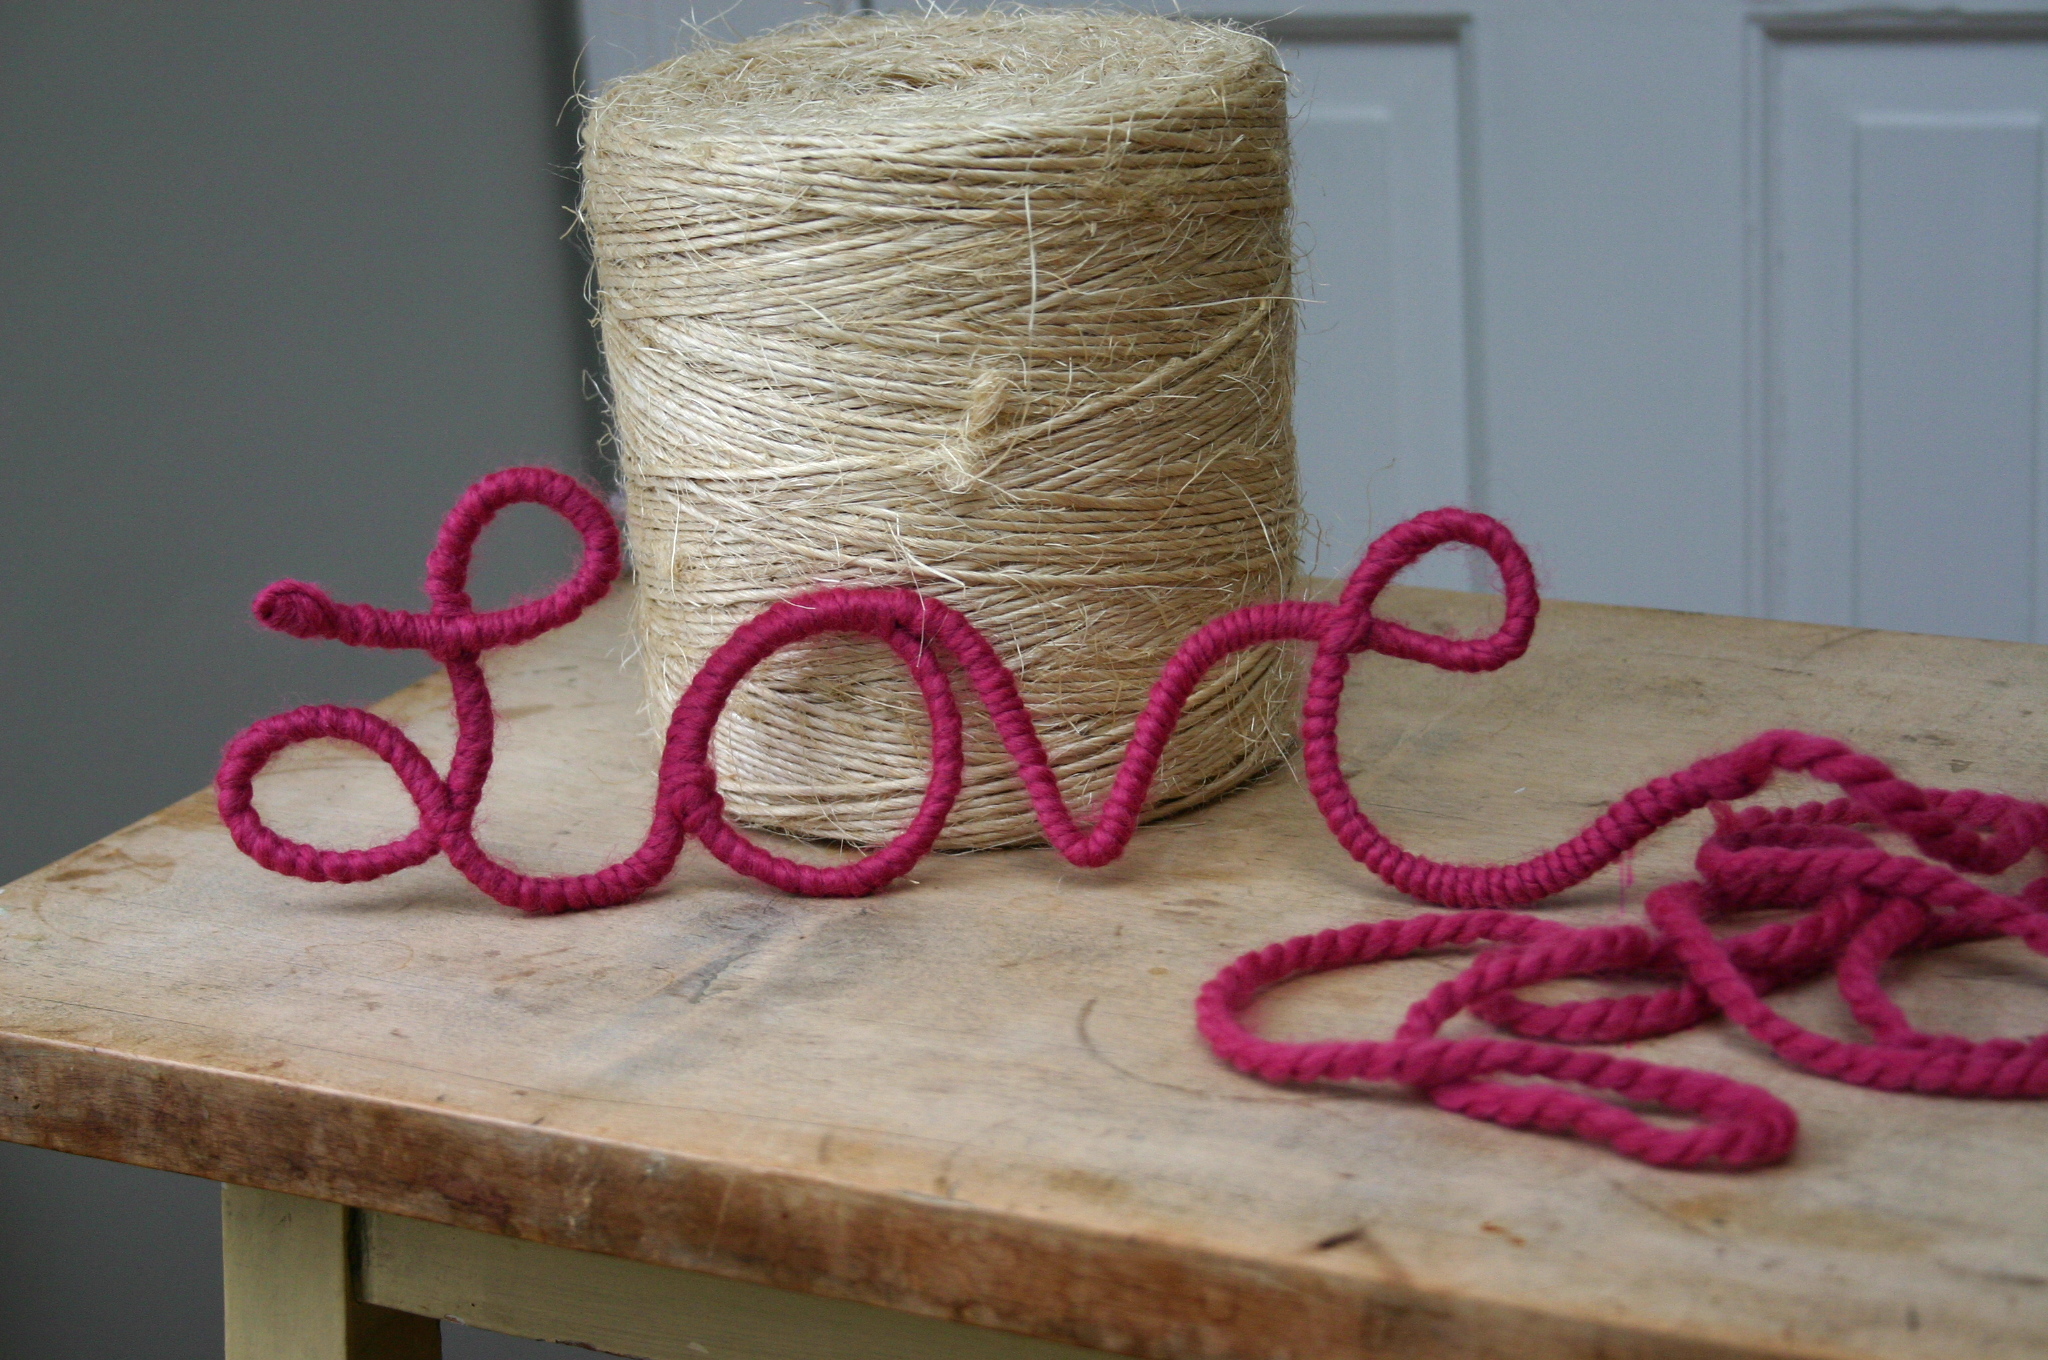

Spell out your feelings with this easy-to-make sign of love.


To make this you will need: wire reinforced clothesline (available at home improvement & hardware stores), yarn & wire clippers. Clip off a length of clothesline (it took about a yard to make this) and shape into the word, "LOVE". Tie or hot glue end of yarn onto beginning of wire and start wrapping the entire word with yarn.

When you reach a point where two wires cross each other, wrap yarn around both wires to stabilize the design and hold the word in place.

Wrap yarn all the way to the end of the word and tie a knot or add a dab of hot glue to secure. I left about two feet of yarn hanging loose at the end because I liked the way it looked.


Pascale
January 14, 2011 at 2:39 am
L O V E this!!
camilla
January 14, 2011 at 7:38 am
Thanks Pascale – coming from someone as talented as you – that is a huge compliment! 🙂
Charlotte
January 14, 2011 at 3:57 am
Aww, this is so cute. I am a sucker from a bit of therapeutic yarn crafting!
Blue Skies,
Charlotte xo
camilla
January 14, 2011 at 7:39 am
I can’t stop working with yarn -I agree – it is therapeutic!! 🙂
Bonnie@WhatAboutPie
January 14, 2011 at 8:23 am
I really love this! It is so cute! I especially love the extra bit of yarn left dangling at the end…wonderful!
p.s. I didn’t even know there was such a thing as wire reinforced clothesline…thanks for letting me know!
Mariska
January 16, 2011 at 11:12 pm
I love this idea, and also the idea of the wire hearts wrapped with yarn a few posts below. I linked to this post and the wire hearts from my blog – hope that is OK.
camilla
January 17, 2011 at 10:12 am
Thanks Mariska! So glad you like it – these crafts are so easy to make – great for a wide age range of kids. Take Care, C
emmy-ray
January 17, 2011 at 11:37 am
Such great ideas! I posted a link to your tutorials on my blog in my “Make Something Monday” feature. Thanks for the creative inspiration!
camilla
January 17, 2011 at 2:19 pm
Emily – Thanks for linking! Take Care, Camilla
Jill
January 17, 2011 at 1:51 pm
I saw your project on One Pretty Thing and am totally smitten! Thanks for a lovely, simple valentine’s idea.
camilla
January 17, 2011 at 2:18 pm
Thanks so much Jill!
C.R.A.F.T.
January 17, 2011 at 2:31 pm
This is a GREAT idea! Please come on over and link up to MMM 🙂
Mrs. Wright
January 17, 2011 at 6:35 pm
This is so cute and I got sucked into ALL your posts! I’m headed to add you to my reader RIGHT NOW! Great job!
Onica @ The Peasant Housewife
January 18, 2011 at 1:49 pm
I saw this on One Pretty Thing and LOVE it! I do love me all things fibery related!
sewtara
January 22, 2011 at 6:14 pm
Oooohhhh lovely. This gives me inspiration for a project! 🙂
Casa e Cose
January 24, 2011 at 10:06 am
Hi! What a lovely diy! I have to get some yarn and some wire and I will defenatly do it!
Pingback
Kraft ★Croch
January 25, 2011 at 12:41 pm
You have just given me a lovely idea to surprise a friend of mine. 🙂
Thank you!
Miss Jenn
January 25, 2011 at 12:45 pm
I love this project, great inspiration. How did you knot the yarn on the ends and how did you keep it from unraveling?
camilla
January 25, 2011 at 1:10 pm
Thanks Jenn! To start – I pulled the yarn over the end of the wire first, then I starting wrapping the yarn around the wire, tied a knot and then continued to wrap around the rest of the wire (covering my knot with the yarn as I went). I did the same at the end, except I tied a knot and left about two feet hanging on.
Hope this helps – let me know if you give it a try – I’d love to see it! Take care and have a great day! Camilla
Pingback
Kimberly
January 25, 2011 at 12:47 pm
this is absolutely darling. Thanks so much for sharing!
Sharon
January 25, 2011 at 7:05 pm
This is awesome! I hear the hardware store calling my name now….
camilla
January 25, 2011 at 10:05 pm
Thanks Sharon! It’s very simple to make – you’ll enjoy it! Take Care, Camilla
Ivory
January 26, 2011 at 12:32 am
Absolutely love this!!!! I’m not big on valentine’s day but I can already think of a million other things to do with this idea. I especailly can’t wait to make something for my neice’s room. Her name or ABC’s or a quote from her favorite book, I think they’d look so great hanging on her wall. The only question I have is when you hit letters like the O where you have to double over part of the letter, did you start the letter than tie off the yarn and start over at the bottom of the letter or did you just double back over what you had already wrapped? I hope that question makes sense :p
camilla
January 26, 2011 at 8:17 am
You ask a great question! I forgot to mention this in the tutorial – for the “O” I did cut, knot and start with a new strand of yarn to avoid going over the yarn with another layer and bulking up the thickness too much. I hope this is clear – thanks for asking – let me know how it turns out! I’d love to see your finished products! Take care, Camilla 🙂
Chrystie DeSmet
January 26, 2011 at 1:20 am
I LOVE this idea! I just made letters like this out of 12 gage beading wire. I never thought to put yarn around it! 🙂
Pingback
robin
January 26, 2011 at 6:41 am
so very cool…and I will be going by the hardware store TODAY! 🙂
Pingback
Lúlla
January 26, 2011 at 11:37 am
What a great idea. Thank you for sharing
lori
January 26, 2011 at 12:25 pm
on the “o” you could continue going around the wire and as you get back to the “L” catch the back wire and continue on to the “V”. not sure if it would look much different from cut/knot and starting with a new strand of yarn. because of the extra yarn you have in the 2 cuts and /knots make sense? sorry if it doesn’t it did im my mind. haha
Angie
January 26, 2011 at 3:08 pm
Not that any one person invented this project/idea, but I made one almost exactly like that about a year ago from an online class project for “Style School” taught by Elsie Flannigan. 🙂 You can see mine here: http://vintageofficetype.blogspot.com/2010/02/love-this-project.html
camilla
January 26, 2011 at 3:57 pm
Wow! Angie – that looks great! Thanks for sharing 🙂 take care, Camilla
chels;
January 26, 2011 at 6:19 pm
so cutee (:
Adrienne
January 26, 2011 at 8:50 pm
I just made one of these from this tutorial but I used a wire hanger because I didn’t have this other wire. I think it might have been harder to bend but it worked out great! (wish I could show you somehow!) Thanks for this idea. It looks great on my wall.
camilla
January 26, 2011 at 9:21 pm
Adrienne – I would love to see it! Glad the hanger worked out! Camilla
elena fiore
January 26, 2011 at 11:42 pm
Che bello !
Wow !!!
Ciao da Milano, Italia
elena°*°
Monica
January 28, 2011 at 12:58 pm
Thank you for sharing all the creative and wonderful ideas. You ,for sure, inspired me !!!
Monica Ivanski
joey
January 28, 2011 at 3:04 pm
This is a fabulous tutorial, since posting this to my blog, I already have three friends giving it a go this weekend. My hubby want to have a go too. Excellent. Thank you.
Pingback
Pingback
Pingback
kim west
February 6, 2011 at 11:32 am
I featured this on my blog today!!!
http://www.kimboscrafts.blogspot.com
Pingback
Angela
February 7, 2011 at 5:12 pm
I posted a link to this post of yours on my blog. So cute!
http://whatwouldangelado.blogspot.com/2011/02/valentines-fun.html
camilla
February 7, 2011 at 5:56 pm
Thanks Angela! This is one of my favorite projects! Take Care, Camilla
Pingback
Adrienne
February 8, 2011 at 5:41 pm
Hey Camilla! Here’s one of my blog posts with a picture of this tutorial and a link to your blog: http://snowandbuttercups.blogspot.com/
I had a lot of fun making it! Thanks for sharing
camilla
February 8, 2011 at 7:11 pm
Adrienne – Great job!!!!!!!!! I lOVE it!!!!!!! Thanks so much for sending along the link – it means a lot to me! Take Care, Camilla
Chiara
February 9, 2011 at 10:27 am
Wow!!! 🙂
ciao
Chiara
Pingback
Jennifer Larsen
February 11, 2011 at 5:05 pm
Do you know how long it needs to be ( so it is easier to wrap the yarn with a cut piece of clothesline). Also, can it be regular plastic clothesline, or does it need to be with wire? The plastic clothesline is a 1/3 the cost of the conduit stuff
camilla
February 11, 2011 at 6:10 pm
Hi Jennifer – I pulled out a lot of yarn – about 3 to 4 times the length of the word – better to have too much than not enough. I agree – so much easier to wrap it around with a small bundle of yarn in your hand rather than a full skein. As for the laundry line – I recommend anything with a wire – it will hold the shape. If the plastic clothesline can hold a form – than that should work. Send along a photo when you’re done – I’d love to see it. Thanks for your question, take care, Camilla
Angela
February 12, 2011 at 4:36 am
That is so cute! I’ve add it in a Valentine’s Day Crafting Ideas roundup on my blog with a ink back here:
http://anzouyaspool.blogspot.com/2011/02/valentines-day-crafting-ideas.html
Thank you for this incredible idea!
Pingback
Pingback
Pingback
Cutelicious
February 18, 2011 at 2:06 pm
Sorry, I left my comment in German … I love this idea! Think my daughter could even helpf with it!
Thanks
Ursula
Pingback
Pingback
Pingback
Brooke
April 21, 2011 at 11:18 am
Are there other words that you have created?
camilla
April 21, 2011 at 4:42 pm
Hi Brooke! I have only done the word, LOVE. However, I would think you could do any word or even an initial or number. Take Care, Camilla
Pingback
Eva
June 8, 2011 at 12:34 pm
I love this project so much! I gave this to my Mom for mother’s day and she loved it! If you do the same thing with thinner yarn and wire, could you make jewelry with it? That is the project that i want to see next
camilla
June 8, 2011 at 3:27 pm
Eva – thanks for letting me know – so happy to hear it made your mom happy! I think you have an excellent idea! “Mini yarn love” on a necklace would be fantastic – I will have to give it a try!
Camilla
julie
July 15, 2011 at 3:53 pm
I’ve been doing this for years with thinner wire. You can “write” names for nametags for presents and stockings, hang them on stemware to ID drinks. There are websites that show how to make name or initial pins and pendants out of sterling or gold wire. You can also make interesting shapes or designs and hang in windows as sun catchers. Can also be adhered to decorate frames, scrapbooks, just about anything. I’ve even made signs for my children’s rooms. Good for temporary signs for parties, ex. Powder Room. Armature wire, or any 16 gauge wire from the hardware store is much easier to manipulate than wire hangers, and not very expensive.
Julie
Kim Thomas
July 18, 2011 at 9:44 am
So cute, and such a great idea! I’m always looking for crafty home dec. Thanks for the inspiration.
Suzanna
July 22, 2011 at 3:01 am
I love this and did it with a bunch of ladies at one of our recreational church activities, it went down so well. Thank you for all your wonderful ideas!!
Ada @ NY
July 25, 2011 at 2:39 pm
I LOVE it!!! How creative + beautiful. I may create a large one for one of my walls or as a gift. Thanks for ur inspiration!
connie
August 11, 2011 at 2:39 pm
This is such a great idea!! I love how simple and easy it is to make but how cute it looks!
Wendy
September 21, 2011 at 2:41 am
Such a wonderful idea! Thank you for sharing!
Charlie
December 28, 2011 at 9:41 pm
So beautiful! I’ll be making a few of these for around our house this Valentine’s Day! And I’m linking to this in my V-Day post this week. 🙂
Aloha,
Charlie
stevie
January 8, 2012 at 2:58 pm
I love this crafty valentine day craft.
Peggy
January 18, 2012 at 5:25 pm
Wow! Who doesn’t have these supplies around the house? Who knew to put them together? YOU! And thank you for sharing your creative spirit! I found you via Charlie at ‘Attempting Aloha’. Thank you both for the inspiration!
Florentyna
January 31, 2012 at 2:01 pm
L O V E this!!
Amy
February 1, 2012 at 7:12 pm
I made one of these a few months ago using your tutorial, and I love it! Mine actually looks identical to yours because I used yours as a pattern to bend my wire. 😀 Thanks so much for posting it!
Aretusa
February 2, 2012 at 11:14 pm
Hi Camilla!
This is Aretusa from the blog Petit Pooh Mon Amour.
I loved your project so much and made a post about it on my blog.
Hugs
Aretusa
Kate
February 16, 2012 at 3:56 am
Hi! Thank you so much for this tutorial! I made it with about 15 girls at our youth valentine’s party! Each girl made different things out of the wire, some made the word “love” their name, a heart and arrow going thru…very creative! It was the PERFECT craft! They loved it!
camilla
February 16, 2012 at 8:31 pm
Kate – That is great to hear! Thanks for letting me know! Take Care, Camilla 🙂
Adel-del-del
March 9, 2012 at 4:44 pm
So cuuute ^^
Karen
March 23, 2012 at 12:17 pm
Thanks so much for sharing this – each Friday I go in to our local special needs school & do crafts with the 16-18 year teenagers & this would be a great thing to try with them…Thanks again
Dana
April 6, 2012 at 12:13 pm
I’ve been wanting to make this for a couple of months and finally just finished it today. Since I’m really limited on the supplies I have at my disposal, I wasn’t sure what I could use for wire. I was throwing away an old spiral-bound notebook when I started playing with the wire then realized I could use that for the project! Yay re-purposing! I ended up ending mine with a heart instead of only the word, and since my yarn is fairly thin, I did a few layers. It looks great! I’m in such desperate need of using anything to brighten up my room and make it look a little bit more homey and this is perfect. Thank you!
Reju
April 19, 2012 at 8:49 am
Wow! Great idea let me try and let u know….
Mandy @ Sugar Bee Crafts
April 26, 2012 at 9:27 pm
I am planning on making this with a big group of girls – – do you know how much clothesline you used? That way I can be sure to have enough….
camilla
April 26, 2012 at 10:15 pm
Hi Mandy – I used about a yard of line to make the word, LOVE. Hope this helps and thanks for stopping by and commenting! Have fun with your friends! Camilla
Teresa
May 27, 2012 at 9:55 pm
I am doing this now and it is not as easy as I wanted it to be. I used some old wire we had from putting up fence in the cback yard.So word of advice to anyone use an easy to bend wire.
I hope mine looks as good as yours does . Ty for your great ideas!! :n))
Katherine
July 3, 2012 at 5:15 am
How many yards of yarn did you use?
camilla
August 1, 2012 at 4:49 pm
Katherine, Way to go!! These look great! Thanks for sharing, Camilla
Katherine
July 6, 2012 at 12:06 am
I made a few and framed them! You can see them here: http://oi46.tinypic.com/vh5168.jpg
Thanks for the idea! I’m going to use them to decorate my dorm room.
Emma
July 26, 2012 at 5:06 pm
So simple, yet so clever – as all the best ideas are –
thank you for this, I look forward to trying it out in many different forms for many different people!
Loralee
October 13, 2012 at 12:45 am
Just pinned this (and the Pumpkin Yogurt, and Chopstick Helpers!) Thanks again!
lien
January 6, 2013 at 9:57 pm
hai..my name lien,im from malaysia..can you teach me how to make a words GONG XI FA CAI using wire and yarn.p
abbey
February 13, 2013 at 1:28 pm
i love this diy! but i have a question. at the end where you have the extra yarn, how did you make it look “braided” like that? did you knot a second piece of yarn at the end and wrap it around like that?
justin
February 14, 2013 at 12:37 pm
Don’t remember where I found this, but loved it and made it for my wife for Valentine’s Day this year. Did a bit of a twist on it – used a coat hanger so that it was sturdier (though much harder to work with), and left a length after the “e” to create a sort of stand/rest so that it stood up on it’s own. I wrapped that part as well and glued a small yarn ball of the same color to the end of it, bent it just so, and made the stand/rest part look like a ball and trail of yarn leading to the word. Sort of came off looking like one of those frozen action statues like a spilling cup or whatever, but this as yarn sort of magically spelling out the word “Love”. Anyway, love it, thanks for the great idea.
My finished product:
http://farm9.staticflickr.com/8386/8474375452_af6bd56a22_b.jpg
camilla
February 15, 2013 at 10:44 pm
Justin – You ROCK!!!! Way to go!!! Love it, C
Camilla
March 16, 2013 at 3:51 pm
This is so cool c: